Follow Me On Pinterest!

Ah, banana pudding—such a nostalgic treat! Each bite is like taking a trip down memory lane, isn’t it? Growing up, my mom would whip up a batch of this creamy goodness for special family gatherings, and let me tell you, it was the highlight of the day. When you combine layers of velvety pudding, fresh bananas, and crispy vanilla wafers, you’re not just serving dessert; you’re serving joy! This recipe brings back that delightful warmth and comfort, enveloping you like a cozy hug from your childhood. So grab your apron; let’s get cooking!
Why you’ll love this recipe
Why is homemade banana pudding such a beloved classic? First off, the flavor is breathtaking! The creaminess of the pudding dances harmoniously with the sweetness of ripe bananas, and the soft crunch of vanilla wafers adds a lovely texture that makes each mouthful a little adventure. Plus, it’s incredibly simple to make! Seriously, if you can whisk and layer, you can create this masterpiece.
This dessert isn’t just delicious; it’s also one of the most comforting sweets you can whip up. It’s the perfect ending to a long day or a delightful addition to any gathering. And let’s be real—who can resist the appeal of digging into a bowl of homemade goodness? It invites those around you to linger a little longer at the table, sharing stories while savoring each creamy bite.
Gather these ingredients

Let’s gather our treasure trove of ingredients, shall we? Each component plays its part in making this pudding sing:
2 cups milk: Whole milk is your best friend here, bringing that rich creaminess. You could use 2% if you’re watching the waistline, but you’ll miss some of that luscious vibe.
1/2 cup granulated sugar: This is the sweet hug that ties everything together. You can try brown sugar for a deeper caramel note.
1/4 cup cornstarch: Our secret thickening agent! It gives the pudding that desirable creamy texture. If you’re in a pinch, you can swap it with a gluten-free starch, but the texture might vary a bit.
1/4 teaspoon salt: Don’t skip the salt! It enhances the sweetness and balances out the flavors beautifully.
3 large egg yolks: These precious golden gems add richness and help achieve that silky, custard-like texture. Remember, no whites here—save those for a meringue!
2 tablespoons unsalted butter: A little pat of butter adds an extra layer of richness at the finish. You can totally use salted, but it may shift the sweet-salty balance.
1 teaspoon vanilla extract: Pure vanilla extract is key here. It enriches the flavor like a warm hug from Grandma, while imitation vanilla just doesn’t quite have that magic touch.
Vanilla wafers: These are the backbone of the pudding—sweet, delightful, and absolutely essential. Try to get the ones that are crispy for that perfect layering.
3 ripe bananas, sliced: Choose bananas that are spotty and fragrant for maximum sweetness. No one wants a bland banana sneaking in!
Whipped cream (for topping): You can either whip your own heavy cream (like I do for that fresh flavor) or grab a store-bought can if you’re short on time.
Preparing Old-Fashioned Homemade Banana Pudding
Now, let’s roll up our sleeves and get cooking! Here’s how to bring this delicious creation to life—it’s easier than you think!
In a medium saucepan, combine the milk, sugar, cornstarch, and salt. Whisk until smooth. Turn the heat to medium and cook while stirring constantly. You want to bring this mixture to a gentle simmer until it thickens up, which takes about 5-10 minutes. Patiently keep whisking; this step is where all the magic happens!
While that’s heating, grab a bowl and lightly beat the egg yolks. Once the milk mixture is steaming and slightly thickened, gradually whisk in a bit of the hot mixture into the yolks to temper them. This prevents scrambled eggs—yikes! Pro tip: Go slowly!
After tempering, return the yolk mixture to the saucepan. Cook on medium-low heat for another 2-3 minutes, stirring until it thickens even more. Then, take it off the heat and eagerly stir in the butter and vanilla extract—be prepared for the heavenly aroma!
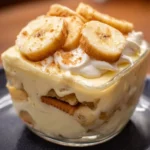
Now comes the best part: layering! Grab your serving dish and start with a layer of vanilla wafers, then a layer of the sliced bananas, followed by a generous layer of your luscious pudding. Keep layering until you use all your ingredients, ensuring you finish with a glorious layer of pudding on top.
Cover and chill in the refrigerator for at least two hours. This allows the flavors to mingle beautifully and helps the pudding set just right. When ready to serve, top it all off with a cloud of whipped cream. Voilà!
How to plate and pair
To really elevate your banana pudding experience, consider these serving suggestions. First, when you scoop your pudding, you want to ensure each dish gets a lovely mix of layers. Why not add a sprinkle of crushed vanilla wafers on top for a little extra texture? They’ll add that crunch every bite craves!
You could also pair this pudding with a cup of rich coffee or a dessert wine for a lovely contrast of flavors. If it’s a gathering, presenting it in a large, clear trifle dish will wow your guests. It showcases those beautiful layers, and who can resist something that looks as good as it tastes?
Keeping leftovers fresh
You might be wondering, how do we keep this pudding lovely for the next day (if it lasts that long)? Well, if you have leftovers—you lucky soul! Cover them tightly with plastic wrap or transfer to an airtight container before sticking it in the fridge. Just remember, it’s best enjoyed fresh, so try to eat it within the next couple of days.
While banana pudding can technically be frozen, I don’t highly recommend it. The texture can change, making the pudding watery—and nobody wants that. So, keep it chilled and enjoy it in all its creamy glory!
Pro chef tips
Here are my insider secrets for banana pudding success!
Don’t rush the thickening! Cooking the mixture slowly is crucial; it ensures that the cornstarch activates and the pudding turns out perfectly creamy.
Use high-quality ingredients. The better the ingredients, the more delicious the dish. Go for fresh, fragrant bananas and pure vanilla extract.
Layer wisely. Don’t just toss the ingredients in randomly. You want those beautiful layers of banana, wafer, and pudding to shine!
Chill for flavor. Never skip the chill time; it allows the pudding to reach its full flavor potential. Plus, it’s a great make-ahead dessert.
Creative Twists
Feeling adventurous? Here are some ideas for putting your spin on this classic:
Chocolate version: Swap out half of the milk for chocolate milk, and add chocolate wafers for a twist that’s perfect for any chocolate lover!
Nutty banana pudding: Add a sprinkle of chopped pecans or walnuts for a wonderful crunch—plus, it adds a lovely richness.
Coconut flair: Mix in some shredded coconut, giving it a delightful tropical touch. Just think of those sandy beaches while you dig in!
Dairy-free option: Substitute coconut milk for dairy milk and use a plant-based whipped cream for a vegan twist that doesn’t skimp on flavor.
Ingredients list
- 2 cups milk
- 1/2 cup granulated sugar
- 1/4 cup cornstarch
- 1/4 teaspoon salt
- 3 large egg yolks
- 2 tablespoons unsalted butter
- 1 teaspoon vanilla extract
- Vanilla wafers
- 3 ripe bananas, sliced
- Whipped cream (for topping)
Directions to follow
- In a saucepan, whisk together milk, sugar, cornstarch, and salt. Cook over medium heat, stirring constantly, until thickened.
- Lightly beat the egg yolks in a bowl. Gradually whisk in some hot milk mixture, then return it to the saucepan. Cook for an additional 2-3 minutes.
- Remove from heat; stir in the butter and vanilla extract.
- Layer vanilla wafers, bananas, and pudding in a serving dish, repeating until all ingredients are used, finishing with pudding on top.
- Chill for at least 2 hours. Serve with whipped cream on top.
Your questions answered
Can I prepare this pudding the night before?
Absolutely! In fact, doing so allows the flavors to meld beautifully. Just remember to chill it properly!How long will leftovers last?
Ideally, try to consume within 2-3 days. The bananas will start to brown over time.Can I freeze banana pudding?
It’s best fresh, but if you have to freeze, know that the texture may not be the same once thawed.What can I use instead of milk?
You can try almond milk or coconut milk for a dairy-free version, but it might alter the flavor slightly.How do I prevent the bananas from browning?
You can toss the banana slices in a little lemon juice before layering them in. It helps reduce browning!
This old-fashioned homemade banana pudding is a treasure; it’s comfort in a bowl, and I can’t wait for you to dive in and create your own version. Experiment with flavors, swap out ingredients, and let your inner chef shine! Every scoop of creamy goodness is a little love letter—and I hope you share that love with your friends and family. Whether you keep it classic or try out the twists, your kitchen is bound to be filled with laughter and joy. Happy cooking, and let’s cherish these sweet moments together!

Homemade Banana Pudding
This old-fashioned banana pudding is a nostalgic treat featuring layers of creamy pudding, fresh bananas, and crispy vanilla wafers, all topped with whipped cream.
Ingredients
Pudding Base
- 2 cups milk Whole milk is best, but 2% can be used.
- 1/2 cup granulated sugar Brown sugar can be used for a deeper flavor.
- 1/4 cup cornstarch Can substitute with gluten-free starch if needed.
- 1/4 teaspoon salt Enhances sweetness and balances flavors.
- 3 large egg yolks No whites; saves those for meringue.
- 2 tablespoons unsalted butter Salted butter can be used but may alter the balance.
- 1 teaspoon vanilla extract Pure vanilla extract is recommended.
Finishing Touches
- 1 package vanilla wafers Crispy wafers are essential for layering.
- 3 ripe bananas, sliced Choose spotty and fragrant bananas.
- to taste whipped cream Can use homemade or store-bought.
Instructions
Preparation of Pudding
- In a medium saucepan, combine the milk, sugar, cornstarch, and salt. Whisk until smooth.
- Turn the heat to medium and cook while stirring constantly until it thickens, about 5-10 minutes.
- Lightly beat the egg yolks in a bowl. Gradually whisk in some of the hot milk mixture to temper the yolks.
- Return the yolk mixture to the saucepan. Cook on medium-low for another 2-3 minutes until it thickens further.
- Remove from heat and stir in the butter and vanilla extract.
Assembly
- In a serving dish, layer vanilla wafers, sliced bananas, and pudding, repeating layers until all ingredients are used, finishing with pudding on top.
- Cover and chill in the refrigerator for at least 2 hours.
- Serve topped with whipped cream.
Notes
For added texture, sprinkle crushed vanilla wafers on top before serving. Best enjoyed fresh, ideally within 2-3 days.